Recent Posts
Stay Warm, Stay Safe: How to Safely Use Space Heaters in Your Home
12/11/2024 (Permalink)
 Let’s go over some tips to safely use your space heater and avoid potential risks.
As the weather gets colder, space heaters become a popular way to warm up small areas quickly. While they’re convenient, they can also be dangerous if not used properly. In fact, space heaters are a leading cause of home fires. Let’s go over some tips to safely use your space heater and avoid potential risks.
The Risks of Space Heaters
The main risks are:
- Fire hazards: Space heaters can easily catch nearby objects on fire, like curtains, furniture, or bedding.
- Electrical dangers: Overloaded outlets or old wiring can cause electrical fires.
- Burn injuries: Space heaters can get very hot to the touch, posing a risk, especially to kids and pets.
Now that you know the risks, let’s go over some ways to prevent them.
Safe Ways to Use a Space Heater
While space heaters can be risky, you can easily reduce the danger by following a few simple safety tips:
Pick the Right Space Heater
Not all space heaters are made the same, so make sure to choose one that’s safe to use.
- Look for safety labels: Choose a heater that has been tested and certified by a trusted group like UL or ETL.
- Check for auto shut-off: A good heater will have an automatic shut-off feature if it tips over or gets too hot.
Keep Your Heater in the Right Spot
Where you place your space heater can make a big difference.
- Give it space: Keep your space heater at least 3 feet away from anything that could catch fire, like blankets, rugs, or furniture.
- Use a flat surface: Always place the heater on a hard, flat surface—not on a carpet or soft material.
- Out of the way: Keep it out of high-traffic areas where it might get bumped or knocked over.
Plug It Straight into the Wall
This is an important tip: Never plug your space heater into an extension cord or power strip.
- Wall outlet only: Space heaters need a lot of power, so they should be plugged directly into a wall outlet.
- Don’t overload: Avoid plugging other high-power appliances into the same outlet as your heater.
Turn It Off When You Leave
It’s never safe to leave a space heater on when you’re not around.
- Switch it off when you’re out: Always turn off your heater when you leave the room or go to bed.
- Unplug when not in use: If you’re not using your space heater, unplug it until you need it again.
Timers and Thermostats Are Your Friends
Heaters with timers and built-in thermostats are great for added safety.
- Timers: Set the heater to run for a limited time so it shuts off automatically.
- Thermostats: Adjust the temperature and let the heater turn off when the room reaches your desired warmth.
Why Space Heater Safety Matters
At SERVPRO of Costa Mesa, we’ve seen how quickly fire damage can happen when space heaters aren’t used correctly. By sticking to these safety guidelines, you can lower the risk of fire and enjoy a warm, safe home. If you ever need fire damage restoration, our team is Here to Help®—just give us a call!
Say Goodbye to Mold: How to Keep Your HVAC Ducts Clean and Clear
11/9/2024 (Permalink)
 If you need professional help with mold removal or duct cleaning, contact SERVPRO of Costa Mesa today.
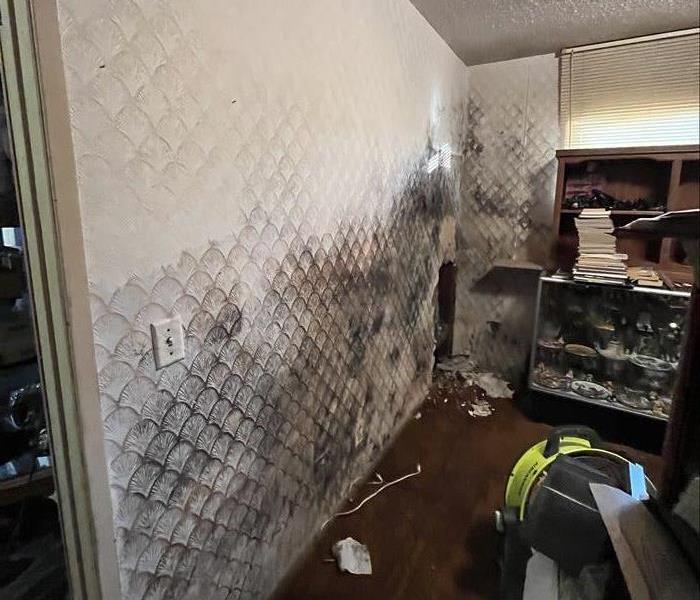
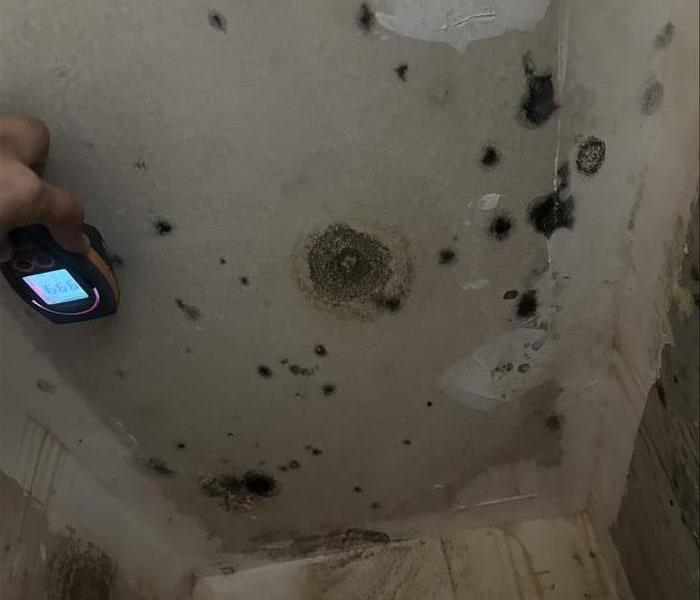
Mold growing in your HVAC ducts can be a real problem, but it’s not always easy to spot. When mold takes hold in your system, it can affect your home's comfort and even the efficiency of your HVAC unit. At SERVPRO of Costa Mesa, we have the expertise to deal with mold in HVAC ducts and prevent future issues. In this blog, we’ll break down why mold shows up in HVAC systems, what you can do about it, and how to stop it from happening again.
What Causes Mold in HVAC Ducts?
Mold needs moisture and a food source to grow, and unfortunately, HVAC systems can sometimes provide the perfect conditions. Here are the main causes:
1. High Humidity: When indoor humidity levels rise, the excess moisture can lead to mold. To reduce the risk, keep your indoor humidity levels between 30% and 50%.
2. Condensation: Cool air passing through HVAC coils can cause condensation to form. If that moisture isn't properly drained, it can collect in your ducts, creating an ideal mold environment.
3. Dust and Dirt: Mold needs organic material to grow, and dust and dirt are perfect for that. When debris builds up in your system, it gives mold the nutrients it needs to thrive.
4. Poor Airflow: If your HVAC system doesn’t have good airflow or is blocked by dust and debris, it can cause moisture to build up in your ducts, which leads to mold growth.
5. Leaky Ducts: Leaky ducts can allow moist air into your system. That added moisture is just what mold needs to grow, so it’s important to seal leaks and keep the system airtight.
Tips for Preventing Mold in Your HVAC System
Once you’ve addressed the mold problem, it’s important to take steps to make sure it doesn’t come back. Here are some prevention tips:
- Regular maintenance: Have your system cleaned and inspected regularly.
- Control humidity: Use a dehumidifier to keep moisture levels low.
- Replace air filters often: Clean filters help keep dust and mold spores out of the system.
- Ensure good airflow: Make sure vents and ducts are open and unblocked.
- Seal leaks: Keep ducts sealed to prevent moisture from entering.
- Fix Condensation Issues: Clear blocked drain lines, repair any leaks, and make sure your system is draining properly to prevent moisture buildup.
- Replace Moldy Ducts: In cases of severe mold infestation, you might need to replace parts of your duct system.
Why Choose SERVPRO®?
Mold in HVAC ducts can be an invisible problem, but it’s one that can be managed with the right steps. By understanding the causes and taking action to clean and maintain your system, you can keep your home comfortable and mold-free. If you need professional help with mold removal or duct cleaning, contact SERVPRO of Costa Mesa today. We’re Here to Help® keep your HVAC system clean and efficient!
Why Are Insurance Carriers Leaving California?
11/6/2024 (Permalink)
The recent wave of insurance carriers scaling back their operations or completely withdrawing from California has left many homeowners and businesses scrambling for coverage options. State Farm, Allstate, and other major insurers have pulled back or stopped writing new policies in the state, leading to a scarcity of options and, in some cases, skyrocketing premiums. This trend has sparked concern and conversation about what is driving insurance companies out of California. Let’s take a closer look at the main reasons behind this exodus.
1. Escalating Natural Disasters and Climate Change
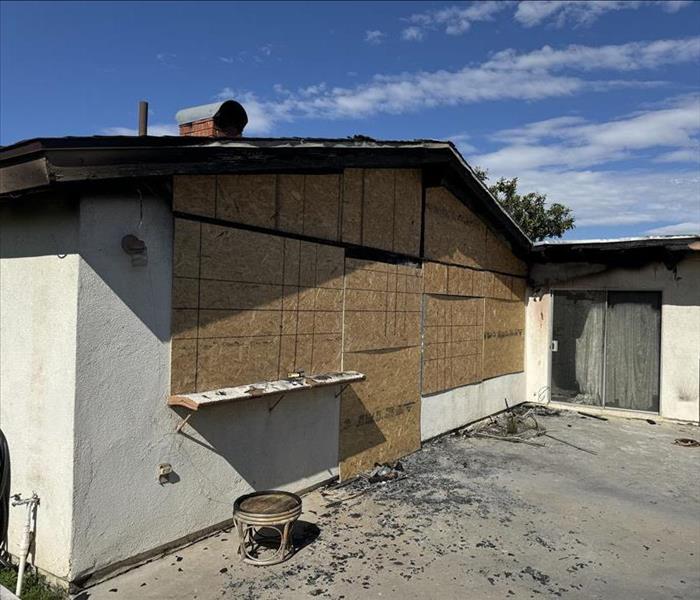
California has been hit hard by a series of devastating natural disasters in recent years, including wildfires, earthquakes, and floods. The increase in wildfire intensity, fueled by prolonged drought and hotter temperatures, has had a particularly severe impact. California wildfires have destroyed thousands of homes and structures, forcing insurers to pay out billions in claims annually.
For insurers, this uptick in natural disasters translates into heightened risk and higher payouts. When the likelihood of catastrophic events increases, insurance companies must either raise premiums to cover potential losses or reduce their exposure by limiting the number of policies they write. Unfortunately, the intensity and frequency of these events in California have reached a point where many insurers feel that the risk outweighs the reward.
2. Regulatory Constraints on Premium Increases
Unlike other states, California has strict regulations on how insurers can adjust premiums. The California Department of Insurance (CDI) has oversight over rate increases and requires insurers to undergo a lengthy review process to raise premiums. Proposition 103, passed in 1988, mandates that insurance companies receive regulatory approval before increasing rates, which has historically kept premium growth in check. While this benefits consumers in the short term, it creates challenges for insurers trying to respond to rapidly changing risk environments.
In a state where the cost of claims is soaring due to natural disasters, insurers argue that they need to adjust premiums accordingly. However, the regulatory process often delays or denies their requests for rate hikes, leaving insurers unable to match revenue to rising costs. For many carriers, the lack of flexibility has led them to conclude that remaining in the California market is simply not sustainable.
3. Reinsurance Costs and Market Dynamics
Reinsurance is a crucial part of the insurance business, allowing insurers to spread their risks by purchasing coverage for themselves. However, the cost of reinsurance has surged in recent years, particularly for high-risk areas like California. Reinsurance providers have raised their prices due to the rising risks associated with natural disasters, and this expense ultimately trickles down to primary insurers.
As reinsurance costs rise, insurers in California find themselves in a difficult position. They must either absorb these costs, which erodes profitability, or pass them along to consumers, which may not be allowed due to regulatory constraints. The rising cost and complexity of reinsurance have made California a less attractive market for many insurers.
4. Legal and Political Challenges
California’s legal environment also poses challenges for insurers. Lawsuits related to claims disputes, regulations regarding policy renewals, and the potential for legal action in the aftermath of natural disasters make operating in the state more complex. Additionally, political pressure often influences regulatory decisions, adding uncertainty to the insurance landscape.
For example, following devastating wildfires, there has been a public push for “non-renewal moratoriums,” preventing insurers from canceling coverage for homeowners in fire-prone areas. While these measures protect consumers, they add to insurers’ risk exposure, as they are often forced to maintain policies that they might otherwise consider too risky. The combined legal and regulatory pressures are a significant factor in carriers’ decisions to reduce or end their business in California.
5. The Availability of Government-Backed Coverage Programs
With many private insurers exiting the market, government-backed insurance programs like California’s FAIR Plan (Fair Access to Insurance Requirements) have stepped in as a last-resort option for consumers. The FAIR Plan is intended to provide basic fire insurance to those who cannot secure coverage in the traditional market. However, it lacks comprehensive coverage, and its rising usage has underscored the urgency of the problem.
The expansion of government-backed plans, which are less financially sustainable than private insurance, has made some insurers wary. Private carriers fear that an over-reliance on FAIR and other government programs could undermine the market further, leading to a situation where even more of the insurance load is shifted to government agencies, further destabilizing the market.
6. Implications for Homeowners and the Future of Insurance in California
As more insurers exit the California market, homeowners face a shrinking pool of options and increasingly costly policies. Those living in fire-prone areas are especially vulnerable, as they are either forced to pay exorbitant rates or turn to the FAIR Plan, which may not provide the coverage they need. This creates a challenging situation for both homeowners and businesses and could have a ripple effect on the state’s real estate market and broader economy.
To retain carriers and stabilize the market, California’s policymakers may need to reconsider some of the state’s strict regulatory frameworks and explore ways to balance consumer protection with the operational needs of insurers. Legislative changes, incentives for mitigation efforts, and new approaches to disaster preparedness may help make California a more sustainable market for insurance companies.
In Summary
The departure of insurance carriers from California is the result of a complex interplay of natural disaster risk, regulatory limitations, reinsurance costs, and legal challenges. As climate change continues to exacerbate the intensity and frequency of natural disasters, insurers may continue to view California as an increasingly difficult market in which to operate. Finding a balance between consumer protection and insurer sustainability is critical if the state wants to maintain a healthy insurance market that can meet the needs of its residents.
In the meantime, consumers and businesses in California may need to take proactive steps to protect their properties through risk mitigation efforts and emergency preparedness as the insurance landscape continues to evolve.
The Role of Insurance in Water Damage Restoration: How SERVPRO® Works with Your Provider
10/10/2024 (Permalink)
Water damage is one of the most common types of property damage homeowners and business owners face. From burst pipes to natural disasters like flooding, water can quickly infiltrate your property and cause significant harm. Having insurance coverage for water damage is crucial in helping to mitigate the financial burden, but navigating the claims process can be overwhelming. Not only does SERVPRO® help restore your property, but we also work closely with your insurance company to ensure a smooth restoration process.
Understanding Water Damage Insurance
Before diving into how SERVPRO works with insurance companies, it’s important to understand what types of water damage are typically covered under homeowners or commercial property insurance policies. Most insurance policies cover sudden and accidental water damage, but it’s important to differentiate between types of damage and the source of water intrusion.
- Covered Water Damage
- Burst Pipes: When a pipe unexpectedly bursts due to freezing, age, or pressure buildup, your insurance policy usually covers the resulting water damage.
- Accidental Overflows: Damage caused by malfunctioning appliances (e.g., washing machines or dishwashers) or overflowing toilets is often covered.
- Storm Damage: Water damage caused by heavy rain or wind-driven water that enters your home after damage to the roof or windows may also be covered.
- Excluded Water Damage
- Flood Damage: Standard insurance policies do not cover damage caused by natural flooding (e.g., rivers overflowing, storm surges). You need a separate flood insurance policy for this type of coverage.
- Gradual Leaks: Insurance companies often do not cover damage caused by slow leaks that occur over time due to lack of maintenance.
- Sewer Backups: Unless specifically included in your policy, damage from sewer backups is typically excluded.
The Claims Process and How SERVPRO Helps
When water damage occurs, filing an insurance claim is often the first step in restoring your property. However, the process can be complicated and time-consuming. That’s where SERVPRO’s expertise comes in—not only in providing water damage restoration services but also in working with your insurance provider throughout the claims process.
Here’s how SERVPRO supports you through every step of your restoration journey:
1. Immediate Response and Documentation
At SERVPRO, we understand the importance of acting quickly in the event of water damage. Our team responds promptly to assess the situation, prevent further damage, and begin the restoration process. As part of our initial response, we thoroughly document the damage, which includes taking photographs, videos, and moisture readings. This detailed documentation is crucial for supporting your insurance claim and ensuring that all damage is accounted for.
2. Working with Your Insurance Provider
SERVPRO works directly with many insurance companies and has experience navigating the claims process. We communicate with your adjuster, providing them with the necessary information to help streamline the approval process. Our team submits detailed estimates, progress reports, and documentation of the restoration work to your insurance provider, ensuring that everything aligns with the terms of your policy.
3. Pre-Approval of Restoration Work
Before beginning any major restoration work, SERVPRO coordinates with your insurance company to get pre-approval for services, ensuring that you aren’t left with unexpected expenses. This collaboration helps avoid delays and makes sure that both the property owner and the insurance company are on the same page regarding coverage.
4. Comprehensive Restoration Services
SERVPRO provides comprehensive water damage restoration services, including:
- Water Extraction: Removing standing water to prevent further damage.
- Drying and Dehumidification: Using specialized equipment to dry out your property thoroughly.
- Mold Remediation: Addressing any mold growth that may have occurred due to water damage.
- Structural Repairs: Restoring walls, ceilings, flooring, and other areas affected by water damage.
We ensure that all aspects of the restoration are completed to insurance standards, helping to minimize out-of-pocket expenses for policyholders.
Preventing Future Water Damage
While insurance may cover the costs of water damage restoration, preventing future incidents is equally important. SERVPRO can provide guidance on proactive measures you can take to minimize the risk of water damage in the future, such as:
- Regular Maintenance: Inspect your plumbing, appliances, and roof regularly to ensure they are in good condition.
- Install a Water Detection System: These systems alert you to leaks before they become major issues.
- Seal Windows and Doors: Ensure windows and doors are properly sealed to prevent water intrusion during storms.
When water damage occurs, you need a restoration company that is not only fast and efficient but also experienced in working with insurance providers. SERVPRO has decades of experience in the restoration industry, making us a trusted partner for both homeowners and businesses. Water damage can be overwhelming, but with the right insurance coverage and a trusted restoration partner like SERVPRO, you can navigate the process with confidence. From immediate response and thorough documentation to working with your insurance company and restoring your property, SERVPRO ensures a seamless recovery from water damage.
If you’ve experienced water damage, don’t wait. Contact SERVPRO today for fast, professional water damage restoration services and expert guidance through the insurance claims process.
Storm Cleanup Made Easy: Handling Fallen Trees and Debris
9/14/2024 (Permalink)
Storms can leave quite a mess, especially with fallen trees and debris. If you live in Costa Mesa, CA, it's important to know how to handle these situations safely and effectively. Here’s a straightforward guide to help you manage storm aftermath.
Assess the Situation Safely
After a storm, your first step should be to ensure that the area around your home is safe.
Check for Hazards
Look around for any immediate dangers like downed power lines, broken branches, or unstable trees. Never touch downed power lines and contact your utility company right away if you see any. According to FEMA, downed power lines are extremely dangerous and should be reported immediately.
Wear Protective Gear
When you start dealing with debris, make sure to wear protective gear like gloves, boots, and safety goggles. This will help protect you from sharp objects and other hazards.
Clear Small Debris First
Begin with the smaller stuff. Clearing branches, leaves, and other lightweight debris will make it easier to tackle bigger problems.
Use Proper Tools
Use tools like rakes, brooms, and garbage bags to collect and dispose of small debris. For larger branches, a handsaw or pruning shears can come in handy.
Handle Fallen Trees
When it comes to fallen trees, it’s crucial to handle them correctly to avoid injury or further damage.
Assess Tree Stability
Before doing anything, check if the fallen tree is stable. If it’s leaning on a structure or tangled with power lines, call in professionals. Don’t try to handle it yourself.
Cut and Remove Safely
If the tree is safe to handle, use a chainsaw to cut it into smaller pieces. Always follow safety guidelines and never work alone.
Dispose of Debris Properly
Proper disposal is important for safety and environmental reasons.
Follow Local Regulations
Costa Mesa has specific guidelines for disposing of storm debris. Check with local waste management services for instructions on how to get rid of tree limbs, branches, and other storm-related debris.
Recycle When Possible
Consider recycling wood and green waste. Many communities offer chipping services or green waste recycling programs that turn debris into mulch or compost. It’s good for the environment and can reduce disposal costs.
Prevent Future Damage
Preventive measures can help reduce the impact of future storms.
Regular Tree Maintenance
Regularly check and maintain the trees around your property. Remove dead or diseased branches and consider professional tree trimming. This can significantly reduce the risk of falling limbs during storms.
Secure Outdoor Items
Before a storm, make sure to secure outdoor furniture, garden tools, and other items that could become projectiles in high winds. This can prevent damage and make cleanup easier.
Be Prepared and Stay Safe
Handling fallen trees and debris after a storm in Costa Mesa, CA, requires careful assessment, the right tools, and safety precautions. By following these steps, you can clean up efficiently and safely. For large trees and complex situations, it’s best to call in professionals.
For expert assistance with storm damage cleanup and restoration, contact SERVPRO of Costa Mesa. Our experienced team is here to help you recover quickly and safely from any storm damage.
Are Dryer Vent Fires Common?
8/14/2024 (Permalink)
 If you need assistance with dryer vent cleaning or have experienced a fire and need restoration services, contact SERVPRO of Costa Mesa today!
Dryer vent fires are a serious but often overlooked risk in many homes. For residents of Costa Mesa, CA, understanding how common these fires are and what causes them is crucial to keeping your home safe. In this blog, we’ll explore the frequency of dryer vent fires, what causes them, and how you can prevent them.
The Prevalence of Dryer Vent Fires
Statistics and Facts
According to the National Fire Protection Association (NFPA), between 2010 and 2014, there were an estimated 15,970 home fires involving clothes dryers or washing machines each year in the United States. Of these, 92% involved clothes dryers. These fires resulted in an average of 13 deaths, 440 injuries, and $238 million in property damage annually. This shows that dryer vent fires are a common and serious hazard.
Causes of Dryer Vent Fires
The leading cause of dryer fires is the failure to clean them. Lint and debris can build up in the dryer vent, reducing the airflow and causing the dryer to overheat. Overheating can then ignite the lint, leading to a fire. Other contributing factors include mechanical or electrical failure and improper installation.
How Dryer Vent Fires Start
Lint Accumulation
Lint is a highly flammable material that accumulates in the dryer vent over time. Even if you clean the lint trap after each use, some lint still gets past and builds up in the vent. This buildup restricts airflow, causing the dryer to work harder and overheat.
Clogged Vents
Blocked or clogged dryer vents can cause overheating. When the hot air cannot escape, it increases the risk of igniting lint and other debris trapped in the vent. Regular inspection and cleaning of the vent can prevent this.
Improper Installation
Improper installation of dryer vents can also lead to fires. Using the wrong materials or incorrect vent placement can cause lint buildup and reduce ventilation efficiency. It’s essential to follow manufacturer guidelines and local building codes for installation.
Prevention Tips
Regular Cleaning
Clean the lint trap before and after each use. Additionally, have your dryer vent professionally cleaned at least once a year. For households that use the dryer frequently, more frequent cleanings may be necessary.
Inspect Venting Systems
Regularly inspect the venting system to ensure there are no obstructions or damage. Ensure that the vent is made of rigid or semi-rigid metal, as these materials are less likely to trap lint than flexible plastic or foil.
Proper Installation
Ensure your dryer vent is properly installed. The vent should be as short and straight as possible to allow for efficient airflow. Avoid using screws or bolts that can catch lint and cause blockages.
Avoid Overloading
Do not overload your dryer. Overloading can cause the machine to overheat and increase the risk of fire. Follow the manufacturer’s recommendations for load sizes.
Making Your Home Safer
Dryer vent fires are more common than many people realize, but they are preventable. Regular maintenance and proper installation are key to reducing the risk. These precautions can help protect your home from the dangers of dryer vent fires.
If you need assistance with dryer vent cleaning or have experienced a fire and need restoration services, contact SERVPRO of Costa Mesa. Our team is equipped to handle all aspects of fire prevention and restoration, ensuring your home remains safe and sound. Stay vigilant and proactive in maintaining your dryer vent, and you can significantly reduce the risk of a fire.
Restoring Indoor Air Quality After Water Damage
6/12/2024 (Permalink)
 Restoring indoor air quality after water damage requires prompt action, expertise, and specialized equipment.
Water damage not only wreaks havoc on your property but can also compromise the quality of the air you breathe indoors. Mold, mildew, and other contaminants thrive in damp environments, posing serious health risks to you and your loved ones. At SERVPRO®, we understand the importance of restoring indoor air quality after water damage to ensure a safe and healthy living environment for our customers. In this blog post, we'll explore effective strategies for restoring indoor air quality post-water damage.
Identifying and Addressing the Source of Water Damage
The first step in restoring indoor air quality is to identify and address the source of water damage promptly. Whether it's a burst pipe, a leaking roof, or a flood, it's crucial to stop the water intrusion to prevent further damage and mold growth. Our certified technicians at SERVPRO are equipped with state-of-the-art equipment to detect hidden moisture and address the root cause of the problem.
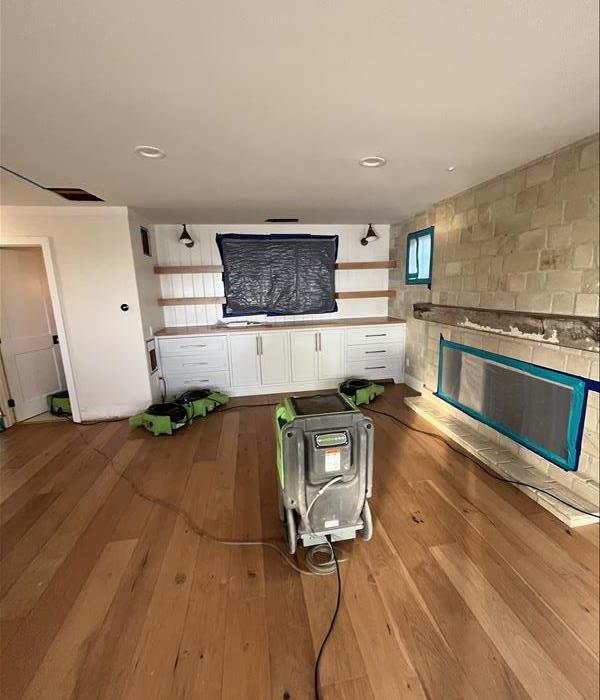
Water Extraction and Drying
Once the source of water damage is addressed, the next step is water extraction and drying. Our team utilizes powerful pumps and industrial-grade dehumidifiers to remove excess water and moisture from the affected areas efficiently. Proper drying is essential to prevent mold growth and restore indoor air quality.
Mold Remediation
Mold can quickly spread in damp environments, compromising indoor air quality and posing health risks. Our mold remediation experts at SERVPRO are trained to identify and eliminate mold colonies effectively. We use specialized equipment and techniques to ensure thorough mold removal and prevent recurrence.
Air Filtration and Purification
To further enhance indoor air quality, we employ advanced air filtration and purification techniques. Our HEPA air scrubbers capture airborne particles, including mold spores, dust, and other contaminants, to improve air quality and create a healthier living environment. Additionally, we use antimicrobial agents to inhibit mold growth and prevent odors.
Restoration and Reconstruction
In severe cases of water damage, restoration and reconstruction may be necessary to restore your property to its pre-damaged condition. Our team at SERVPRO offers comprehensive restoration services, including structural repairs, drywall replacement, and carpet installation, to ensure your home or business is fully restored.
Preventive Measures
Finally, we provide valuable tips and preventive measures to help our customers maintain optimal indoor air quality and prevent future water damage. Regular maintenance, prompt leak repairs, and proper ventilation are essential to safeguarding your property and ensuring a healthy indoor environment.
Restoring indoor air quality after water damage requires prompt action, expertise, and specialized equipment. At SERVPRO, we are committed to helping our customers navigate the challenges of water damage restoration and ensure a safe and healthy living environment. If you're facing water damage issues, don't hesitate to contact us for professional assistance. Your health and safety are our top priorities.
Handling Fallen Trees and Debris After a Storm
5/15/2024 (Permalink)
When nature unleashes its fury in the form of a storm, the aftermath can leave a trail of destruction, with fallen trees and debris scattered across landscapes. As the leading experts in disaster cleanup, SERVPRO® understands the challenges homeowners face in the wake of such events. In this blog post, we provide essential tips and guidance on safely and efficiently handling fallen trees and debris after a storm.
- Safety First: Before embarking on any cleanup efforts, prioritize safety. Assess the area for any potential hazards such as downed power lines or unstable structures. Wear protective gear including gloves, sturdy footwear, and eye protection to guard against injuries from sharp objects or flying debris.
- Assess the Damage: Survey your property to determine the extent of the damage. Take note of any fallen trees, branches, or debris blocking access points or posing risks to structures. If the damage is extensive or if you're unsure about the safety of tackling the cleanup yourself, it's advisable to seek professional assistance from a reputable restoration company like SERVPRO.
- Clearing Fallen Trees and Debris: Begin by removing smaller debris and branches from pathways and driveways to restore access to your property. Exercise caution when moving heavy objects and enlist the help of others if needed. For larger trees or branches, consider hiring trained professionals with the expertise and equipment to safely remove them without causing further damage.
- Dispose of Debris Properly: Proper disposal of storm debris is crucial for both safety and environmental reasons. Separate organic materials such as branches and leaves from non-biodegradable items like plastic or metal. Check with local authorities for guidelines on debris disposal and recycling options available in your area.
- Inspect for Structural Damage: After clearing the immediate debris, conduct a thorough inspection of your property for any signs of structural damage. Look for cracks in walls, roof damage, or leaning trees that could pose a risk of collapse. If you suspect structural issues, contact a qualified contractor or structural engineer to assess the damage and recommend repairs.
- Document Damage for Insurance Claims: Take photographs or videos of the storm damage, including fallen trees and debris, to support any insurance claims you may need to file. Documenting the extent of the damage can help expedite the claims process and ensure you receive fair compensation for repairs and restoration efforts.
Handling fallen trees and debris after a storm requires careful planning, safety precautions, and sometimes professional assistance. By following these guidelines and seeking help when needed, you can navigate the cleanup process efficiently and restore your property to its pre-storm condition. For expert assistance with storm damage cleanup and restoration, trust the professionals at SERVPRO to deliver prompt, reliable service when you need it most.
Protecting your pets from home fires
4/19/2024 (Permalink)
As proud pet owners, our four-legged companions bring joy, love, and endless moments of happiness to our lives. However, in the midst of creating a safe and comfortable home for our furry friends, we may overlook a critical aspect of their well-being – fire safety. At SERVPRO®, we understand the importance of safeguarding your pets from potential home fires. In this blog post, we'll share essential tips and insights to help you create a fire-safe environment for your beloved pets.
Pet-Proofing Your Home
Start by identifying potential fire hazards within your living space. Ensure that electrical cords are out of reach and secure appliances to prevent curious pets from knocking them over. Investing in flameless candles and pet-friendly space heaters can also minimize the risk of accidental fires.
Fire Emergency Plan
Just like your family, your pets need a designated escape plan in case of a fire emergency. Practice fire drills with your pets, so they become familiar with evacuation procedures. Keep leashes, carriers, and other pet essentials in an easily accessible location, making it easier to grab them quickly during an evacuation.
Pet Identification
In the chaos of a fire, pets can become disoriented or scared, making it challenging to locate them. Ensure your pets are microchipped and have visible identification tags with up-to-date contact information. This small step can significantly increase the chances of a safe reunion in case of separation during an emergency.
Safe Spaces
Designate specific areas in your home where your pets can find refuge in case of a fire. Teach them to go to these safe spaces when they hear the sound of a smoke alarm. Make these areas easily accessible and free from potential fire hazards.
Fire Prevention Tools
Equip your home with smoke detectors and fire extinguishers, paying special attention to areas where your pets spend most of their time. Regularly test smoke alarms and replace batteries to ensure they are in working order. These simple steps can provide early detection and containment of a potential fire.
Pet Rescue Alert Stickers
Place pet rescue alert stickers on windows and doors to inform firefighters of the number and types of pets in your home. This vital information can expedite the rescue process and ensure that every member of your family, including your pets, is accounted for.
Prioritizing the safety of your pets in the event of a home fire is a responsibility that should not be overlooked. By implementing these SERVPRO-approved tips, you can create a secure environment for your furry friends and provide them with the protection they deserve. Stay proactive, stay prepared, and safeguard your home and pets from the unexpected. Your pets will thank you for it.
The SERVPRO Mold Remediation Process: Step by Step
3/13/2024 (Permalink)
 Our expert team is here to guide you through the SERVPRO Mold Remediation Process, ensuring a thorough and effective solution to your mold issues.
At SERVPRO®, we understand the stress and concern that mold growth can bring to homeowners and business owners alike. Mold not only poses a threat to the structural integrity of your property but also to your personal belongings. That's why our expert team is here to guide you through the SERVPRO Mold Remediation Process, ensuring a thorough and effective solution to your mold issues.
Step 1: Inspection and Assessment
The first crucial step in our mold remediation process is a comprehensive inspection and assessment of your property. Our certified professionals use state-of-the-art technology to identify the extent of the mold infestation and the moisture sources that fuel its growth. This step is vital for developing a tailored remediation plan.
Step 2: Containment
Once the mold-affected areas are identified, our team employs advanced containment techniques to prevent the spread of mold spores to uncontaminated areas. This includes the use of barriers and negative air pressure to isolate the affected space, safeguarding the rest of your property.
Step 3: Filtration
To further ensure the containment of mold spores, SERVPRO utilizes powerful air filtration equipment equipped with High-Efficiency Particulate Air (HEPA) filters. These filters trap microscopic particles, preventing the recurrence of mold growth and maintaining a mold neutral indoor environment.
Step 4: Removal of Mold-Infested Materials
Our team proceeds to remove and dispose of materials contaminated with mold. This may include drywall, carpeting, and other porous items that cannot be effectively cleaned. This step is essential to eliminate the source of mold and prevent its recurrence.
Step 5: Cleaning and Sanitization
Once the mold-infested materials are removed, the affected surfaces are thoroughly cleaned and sanitized using industry-approved antimicrobial treatments. This ensures the elimination of any remaining mold spores and prevents the development of new colonies.
Step 6: Restoration
After completing the remediation process, our focus shifts to restoring your property to its pre-mold condition. This may involve minor repairs, such as replacing drywall or flooring, to bring your home or business back to a safe and comfortable state.
At SERVPRO, our mold remediation process is designed to provide comprehensive and effective solutions tailored to your specific needs. By following these step-by-step procedures, our expert team ensures that your property is not only free from mold but also restored to its original state. Trust SERVPRO for a seamless and thorough mold remediation experience, bringing peace of mind to property owners facing mold challenges.


 24/7 Emergency Service